... at my blog's new address: http://mynewthing.wordpress.com/
I know it can be a pain to switch your readers, etc, but I'd love it if you joined me over there. I love the new place, and all my posts are over there, too.
My "mommy blog" is over there, too, in case you're interested... http://myadventuresinmotherland.wordpress.com/
Hope to see you there!

Monday, June 23, 2008
Wednesday, June 18, 2008
We don't need no steeking badges!
Sorry about that. I tried hard to think of something clever for my first-ever steeking post. That was the best I could come up with.
If you're not a knitter, or even if you are, you may not be interested in this post. It's very picture heavy, and probably a bit boring... but today was a huge day for me in my knitting life.
Remember this? My cousin's 40th birthday was last August 17. And almost 10 months to the day later, I finish her gift. sigh... for most of those 10 months, it has been sitting at the bottom of my craft cabinet, waiting... for inspiration? for me to have time to finish it? No, it's been waiting for me to man up and do what was needed...
Steeking. Cutting up what you so carefully and lovingly made. Usually reserved for cutting in sleeves and cardigan fronts in sweaters that are knit in the round. While it was recommended that I tink (un-knit - get it? "tink" is "knit" backwards) the tight bind-off, I just got this idea in my head that I needed to steek it. Wait... is it sick to say I wanted to steek it?
Ok, here come the pictures... I wanted to document the whole thing for (my) posterity.
I did some research online for info about steeking. Most of the info about steeking includes some type of alcoholic beverage to steel yourself for the cutting of your beloved knitting project.
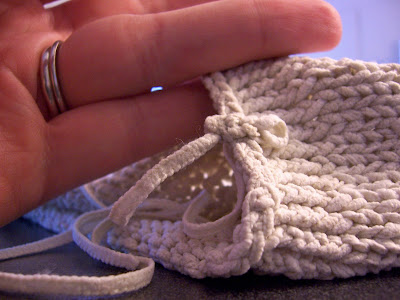
And DONE! It looks just like the pictures I saw online of the crocheted reinforced steeks...

See the "ladder" of stitches between the 2 raised crochet chains? Look really hard -it's there, I promise. That's what needs to be cut. I kind of made up the "turn around" at the top of the slit. Everything I saw online went all the way through the knitted piece or was reinforced by machine stitching.
Ready? OK - CUT!

Oh, so nice! Exactly what I imagined in my head! And when you tug at the waistband, no more tightness!
 But be sure you don't tug too hard. See?
 Whoops - OK, easy to fix... better!
 Here's the next side, ready to go.
 I've moved from cookies to a tall glass of iced water - thankfully. I ate way too many of those cookies.
 I feel confident enough to turn on some music with iTunes, and then I notice that I need to hurry... only 30 minutes left until naptime is over!
 OK - 2nd side is ready to cut!
 I don't know why I don't have a picture of the 2nd side cut, but I love it... I don't know what took me so long to do this! And I don't know why I was so scared... well, yes, I do. It's a scary thing, cutting up your knitting projects.
I'm loving the look of the single crocheted edge on the steeked slits. I thought I'd try a single crocheted border around the armholes.
 See how there are tons of loose stitches up there? There are loose stitches all around. Some due to increases, some due to my inexperience at the time, and some, I think, due to the nature of the yarn that I used.
Anyway, I got one armhole bordered with single crochets during naptime, and finished the other one up during the rest of the afternoon. I was worried the whole time that I was going to run out of yarn.
 But thankfully, I didn't. This is all I had left - you can see the cardboard tube through the yarn, though.
 It's been blocked, and it's ready to be wrapped up to give to the er... birthday girl. (sorry about the horrible vinyl tablecloth. It's the only thing that keeps Big Boy from wrecking out dining room table)....
 See the borders around the armholes?
 See the steeked slit?
Ah, it feels nice to be able to get this done. Finally. I'm going to see my cousin this weekend at my family's reunion, so I'll get to give it to her in person. She knew I was knitting something for her, because I had to explain why I showed up in St. Thomas empty-handed for her birthday celebration. Next time, I'll show you pictures of her in it!
So family reunion in New York = 8 hours of knitting time in the car each way (if the boys will let me do it!). I'll be working on my Domestic Betty Baker's Dozen KAL June Sock... I hope I'll get them done this weekend with such nice, long cartrips.
 Wish me luck!
If you're not a knitter, or even if you are, you may not be interested in this post. It's very picture heavy, and probably a bit boring... but today was a huge day for me in my knitting life.
Remember this? My cousin's 40th birthday was last August 17. And almost 10 months to the day later, I finish her gift. sigh... for most of those 10 months, it has been sitting at the bottom of my craft cabinet, waiting... for inspiration? for me to have time to finish it? No, it's been waiting for me to man up and do what was needed...
Steeking. Cutting up what you so carefully and lovingly made. Usually reserved for cutting in sleeves and cardigan fronts in sweaters that are knit in the round. While it was recommended that I tink (un-knit - get it? "tink" is "knit" backwards) the tight bind-off, I just got this idea in my head that I needed to steek it. Wait... is it sick to say I wanted to steek it?
Ok, here come the pictures... I wanted to document the whole thing for (my) posterity.
I did some research online for info about steeking. Most of the info about steeking includes some type of alcoholic beverage to steel yourself for the cutting of your beloved knitting project.
 So while the fridge was stocked with beer, this was my comfort food of choice:
 Better, eh? (very delicious, too - handmade by a friend for my birthday yesterday)...
 So I laid out the Coachella, cookies, and scissors in front of my computer. I was going to read the toots word for word (BTW - the tutorial I relied most on was this one. THANK YOU, EUNNY!!!) as I attempted this brave feat.
After reading about several different ways to reinforce your steek, I decided upon the crocheted steek. Heck, I'm a crochet wiz after making a couple amigurumi, right? Um... It really helps to find a tutorial that really tells you step by step how to do.. whatever it is you're doing. My first attempt at crocheting on my reinforcement was completely wrong. I'm afraid about what would've happened it I had cut after having done this, whatever it was I did.
 This was wrong. Don't do it this way.
But, thanks again to Eunny (new website!), I ripped out the sad crochet chain I attempted at first and really got started.
After eating a cookie (or 3). MMMMmmmuch better.
OK - here was the line (marked by the straight pin) that I was going to be cutting. Starting to crochet (correctly this time, I might add)....
And DONE! It looks just like the pictures I saw online of the crocheted reinforced steeks...
See the "ladder" of stitches between the 2 raised crochet chains? Look really hard -it's there, I promise. That's what needs to be cut. I kind of made up the "turn around" at the top of the slit. Everything I saw online went all the way through the knitted piece or was reinforced by machine stitching.
Ready? OK - CUT!
Oh, so nice! Exactly what I imagined in my head! And when you tug at the waistband, no more tightness!
But be sure you don't tug too hard. See? Whoops - OK, easy to fix... better!Here's the next side, ready to go. I've moved from cookies to a tall glass of iced water - thankfully. I ate way too many of those cookies. I feel confident enough to turn on some music with iTunes, and then I notice that I need to hurry... only 30 minutes left until naptime is over! OK - 2nd side is ready to cut! I don't know why I don't have a picture of the 2nd side cut, but I love it... I don't know what took me so long to do this! And I don't know why I was so scared... well, yes, I do. It's a scary thing, cutting up your knitting projects.I'm loving the look of the single crocheted edge on the steeked slits. I thought I'd try a single crocheted border around the armholes.
See how there are tons of loose stitches up there? There are loose stitches all around. Some due to increases, some due to my inexperience at the time, and some, I think, due to the nature of the yarn that I used. Anyway, I got one armhole bordered with single crochets during naptime, and finished the other one up during the rest of the afternoon. I was worried the whole time that I was going to run out of yarn.
But thankfully, I didn't. This is all I had left - you can see the cardboard tube through the yarn, though.It's been blocked, and it's ready to be wrapped up to give to the er... birthday girl. (sorry about the horrible vinyl tablecloth. It's the only thing that keeps Big Boy from wrecking out dining room table).... See the borders around the armholes?See the steeked slit?Ah, it feels nice to be able to get this done. Finally. I'm going to see my cousin this weekend at my family's reunion, so I'll get to give it to her in person. She knew I was knitting something for her, because I had to explain why I showed up in St. Thomas empty-handed for her birthday celebration. Next time, I'll show you pictures of her in it!
So family reunion in New York = 8 hours of knitting time in the car each way (if the boys will let me do it!). I'll be working on my Domestic Betty Baker's Dozen KAL June Sock... I hope I'll get them done this weekend with such nice, long cartrips.
Wish me luck!
Friday, June 6, 2008
It's started again.
So You Think You Can Dance is back on this summer. Last year I had a really hard time knitting while watching it. This year, I found I can single crochet while watching! YAY!!! I can fuel two of my obsessions at the same time. See?

Isn't she cute? She's going to be this. Have you seen Owlishly's patterns yet? I found her when she was featured on the Craftzine blog, and I absolutely fell in love. I think I have about 6 of her patterns so far. This is the first one I've worked on, and it's been a delight! Take a look at her Etsy store when you get a chance.
In other news.... I found some lighter-weight colored paper for cutting.

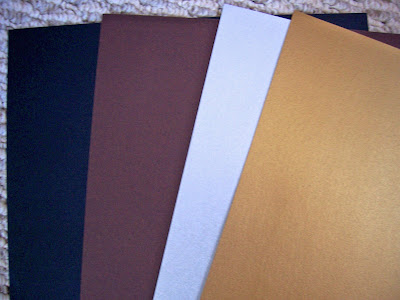 I ran into Staples the other day for a printer cartridge, and I found some good stuff. The paper in the first photo is a little bright for me, but they didn't have any earthy colors in reams available. I may not use all of it for cutting, but I'm sure the boys will get some use out of the paper for crafts in years to come! The second photo is paper I'm much happier about - it's Staples' house brand of "mix and match" stationery. I only bought the black, brown, silver, and gold, but they had tons of other colors I'm sure I'll be going back for. And the paper came by itself - you could buy cards and envelopes separately, but the paper was all I wanted, so it was perfect!
I'm giving my dandelion paper cutting as a house warming gift tonight. I finally also got some spray adhesive, and the cutting looks great without all the shadows behind the dandelion parts. Here it is framed and ready to go...

I also made a cutting for my brother's birthday this year.

and framed....

Poor guy. He's 30 years old, and I realized that the past 3 gifts I've given him are robot related. Remember this for his birthday last year? And this for Christmas? I didn't think about that until after this cutting was done. I'll do something different for him for Christmas this year.
Along with a gift card, I also made him this:

And his wife, whose birthday is only a couple days after his, this:
 I used the stencils from this great site, and the freezer paper method from this site. The freezer paper tutorial has given me another list of projects I want to work on... Anyway, I really like the stencil on the red shirt. I think it looks fabulous. On the blue shirt, it's hard to see. But it's still fun!
On the home front, we've decided to put the boys to work.

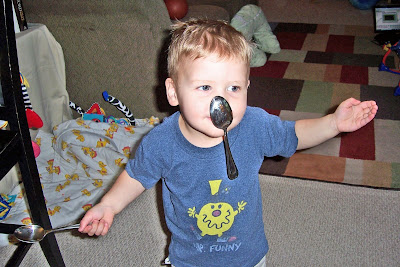
Baby D should be proficient in all the Office applications within the next week or so. He's a quick learner. And the Big Boy? He's going into the entertainment field, of course.
Subscribe to:
Posts (Atom)